| Include Page |
|---|
...
|
...
|
| Panel |
|---|
Инструкция на русском языке. |
| Table of Contents | ||
|---|---|---|
|
1. Installation
| Info |
|---|
Скачать дистрибутив можно на странице плагина. |
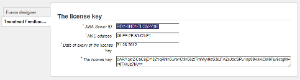
- Первым шагом запрашиваем лицензионный ключ. В административной части JIRA в пункте меню Plugins появится пункт Teamlead Feedback -> Настройка в выпадающем списке. Полученный по электронной почте ключ вставляем в поле Лицензионный ключ и подтверждаем.

- После получение ключа идем в тот же пункт меню и добавляем новую/редактируем существующую форму.

2. Configuration
. |
- The first step is license key request. In the administrative part of JIRA Plugins menu the Teamlead Feedback -> Settings _item appears from the drop down list. You have to insert key in the _license key window and confirm.
- After getting the key go to the same menu and add new / edit an existing form.

2. Configuration
| Info |
|---|
User must have at least administrator permission and maximum system administrator to access the plugin configuration |
| Info |
Для доступа в конфигуратор пользователь должен иметь как минимум права администратора и как максимум права системного администратора. |
Название поля | Описание | ||
|---|---|---|---|
* Name of the form | Заполняется произвольноFilled arbitrarily. | ||
* Project code | In this project the issues will be created В этом проекте будут создаваться запросы. | ||
* Issue type С этим типом запроса тикеты будут создаваться в проекте указанном в разделе Код проекта | The issues with this type will be created in a project referred in Project field. | ||
* User to create users | От имени этого пользователя будут создаваться тикетыThe issues will be created on behalf of this user. | ||
* User for search issues | JIRA will search issues (the fields that will be search indicated below) on behalf of this user От имени этого пользователя будет производится поиск тикетов для вывода совпадений (поля, по которым будет происходить поиск указываются ниже) . | ||
* Jira URL | Адрес JIRA, по которому форма будет обращаться для создания тикета. | The form will refer to JIRA according to this URL form to create issue. | |
Groups | Created user will be automatically added to this group | User groups | Вновь созданный пользователь будет автоматически добавлен в эти группы. |
Administrator email | Пользователь может обратиться по указанному адресу, если происходит сбой при работе формы. | ||
Display matches | Будет ли форма выводить список совпадений на текущий экран. | ||
Search fields | Выбор: Тема, Описание, Комментарий, Окружение. | ||
Component field type | Выбор:
| ||
Version field type | Выбор:
| ||
Allow upload files | Возможность вложить 1 файл в тикет (планируется возможность добавления нескольких файлов ). | ||
Send a notification to new user | Не выводится на экран формы. Будет ли послано уведомление с данными авторизации нового пользователя. | ||
Security level | Не выводится на экран формы. Укажите требуемый уровень, если в вашей JIRA есть уровни доступа. | ||
Field name on the form | Имя пользовательского поля, выводимого на экран. | ||
Field type | Выбор:
| ||
The user can contact the specified address, if it the forms works incorrect. | |||
The output matches | The form will display a list of matches on the current screen. | ||
Fields for search | Summary, Description, Comment, Environment. | ||
Field type for component |
| ||
Field type for affect version |
| ||
Allow file upload | Ability to attach a file to the issue (Ability to add multiple files will be added in the next verisons). | ||
Send a notification after user creation | Does not appear on the screen form. Notification will be sent with the authorization data to the new user. | ||
Access level to the issue after creating | Does not appear on the screen form. Enter the required level, if your JIRA has issue security levels. | ||
Field name on the form | The name of the custom field displayed on the screen. | ||
Field type |
| ||
Custom field | The name of the custom that will be displayed | Custom field in JIRA | Любое пользовательское поле, которое мы хотим вывести в форму. |
Message about the successful registration of the issue | В тексте об успешной регистрации запроса можно использовать переменную созданного тикета %ISSUE_LINK% для вставки в свой текст (например, чтобы сразу перейти по этой ссылке в тикет). | You can use %ISSUE_LINK% variable in your text about successful issue registration. | |
Form code | Generated foem code for inserting | Code of the form | Генерированный код для вставки. |
* required fields.
3. Setting up language in form
To select which language to use in the form you need to add this tags to the code of the form:
<div style='display:none;'><input type='text' id='feedback-language' name='feedback-language' class='feedback-language' placeholder='Выберите язык (en/ru)' value='en'/></div>
If you need English - then leave value='en'. If you need Russian - change value to 'ru'.
4. Use Cases
1. Issue to our company

2. Hosting issue

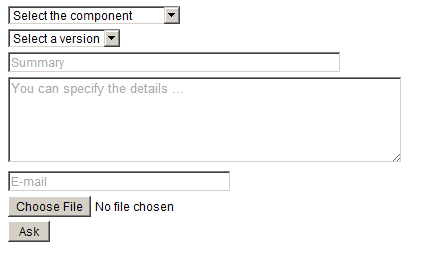
Creating issue from a site page
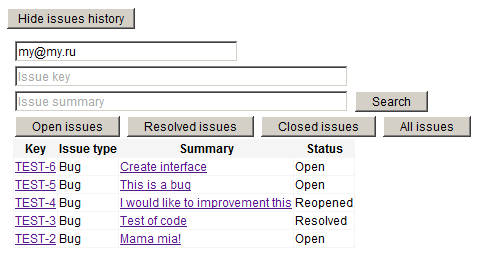
2. Reviewing of your issues from a site page
3. Configurator

4. Code of creating form for insert into a site page:
| Code Block | ||||
|---|---|---|---|---|
| ||||
<STYLE TYPE='text/css'>BODY, input, select, table {
font-size: 12px;font-family: Arial,Helvetica,FreeSans,'sans - serif';}
</STYLE>
<div id='feedback-main-div' style='font-size: 12px; font-family: Arial,Helvetica,FreeSans,sans-serif'>
<div id='feedback-error'></div>
<form enctype='multipart/form-data' id='feedback-form' name='feedback-form' target='feedback-response' method='post' action='http://localhost:8080/plugins/servlet/feedback/create'>
<input type='hidden' name='form-index' id='form-index' value='1'/>
<div><input type='text' id='feedback-summary' name='feedback-summary' size='60' placeholder='Summary' value=''/></div>
<div><TEXTAREA id='feedback-body' name='feedback-body' COLS='62' ROWS='5' placeholder='You can specify the details ...'></TEXTAREA></div>
<div><select id='feedback-component' name='feedback-component'>
<option value='' selected >Select the component</option>
</select>
</div>
<input type='text' id='feedback-email' name='feedback-email' placeholder='E-mail' size='38' value=''/>
<div><input type='file' id='feedback-attachment' name='feedback-attachment' size='38' /></div>
<input type='button' value=' Ask ' onclick='addFeedback()'/>
</form></div>
<iframe id='feedback-response' name='feedback-response' frameborder='no' style='display: none' width='450' height='200'></iframe><div id='feedback-new-issue-div'><input type='button' id='feedback-new-issue-button' value='Create more issue'></div><script type='text/javascript'>
jQuery(window).load(function()
{
   jQuery('#feedback-main-div').show();
   jQuery('#feedback-new-issue-div').hide();
   jQuery('#feedback-response').hide();
   jQuery('#feedback-new-issue-button').click(function ()
   {
    jQuery('#feedback-form')[0].reset();
    jQuery('#feedback-main-div').show();
    jQuery('#feedback-new-issue-div').hide();
    jQuery('#feedback-response').hide();
   });
});

function addFeedback() {
   var summary = jQuery('#feedback-summary').val();
   var email = jQuery('#feedback-email').val();
   if (summary.trim() == '' || email.trim() == '')
   {
    var message = '';
    if (summary.trim() == '')
    {
     message = message + '<div>Enter the summary</div>';
    }
    if (email.trim() == '')
    {
     message = message + '<div>Enter E-mail</div>';
    }
    jQuery('#feedback-error').html(message);
    return false;
}
   jQuery('#feedback-error').html('');
   jQuery('#feedback-main-div').hide();
   jQuery('#feedback-new-issue-div').show();
   jQuery('#feedback-response').show();
   jQuery('#feedback-form').submit();
   return false;
}
</script> |
5. Using Mail Handler
After the plugin is installed new Teamlead Jira Email Handler will appear. It allows you:
- to specify the group which newly created users will be added to;
- to select what group new users will be added to;
- to create issues from emails with empty subject.
To specify the group which newly created users will be added to you need to set up parameter:
userGroup=<usergroup_name>You can see examples of other mail handler parameters on the Atlassian website.
...
| Include Page | |||
|---|---|---|---|
|
|