| Include Page |
|---|
...
|
...
|
| Panel |
|---|
Инструкция на русском языке. |
| Table of Contents | ||
|---|---|---|
|
1. Installation
| Info |
|---|
You can download plugin on from this page. |
- The first step is ask for a license key request. In the administrative part of JIRA Plugins menu item appears the Teamlead Feedback -> SettingsSettings _item appears from the drop down list. You have to insert key in the _license key window and confirm.

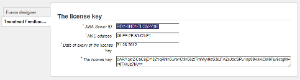
- After getting the key go to the same menu and add new / edit an existing form.


2. Configuration
...
Название поля | Описание |
|---|---|
* Name of the form | Filled arbitrarily. |
* Project | In this project will be create issuesthe issues will be created. |
* Issue type | With The issues with this type of issues will be created in a project referred in Project field. |
* User to create users | On The issues will be created on behalf of this user will be created issues. |
* User for search | От имени этого пользователя будет производится поиск запросов для вывода совпадений (поля, по которым будет происходить поиск указываются ниже)JIRA will search issues (the fields that will be search indicated below) on behalf of this user . |
* Jira URL | According The form will refer to JIRA according to this URL form will be contact for to create issue. |
Groups | Created user will be automatically added to this group. |
Administrator email | The user can apply to contact the specified address, if it fails at work the forms works incorrect. |
The output matches | The form will display a list of matches on the current screen. |
Fields for search | Summary, Description, Comment, Environment. |
Field type for component |
|
Field type for affect version |
|
Allow file upload | Ability to attach a file to the issue (Ability to add multiple files will be added in the next verisons). |
Send a notification after user creation | Does not appear on the screen form. Notification will be send sent with the authorization data to the new user. |
Access level to the issue after creating | Does not appear on the screen form. Enter the required level, if your JIRA has issue security levels of access. |
Field name on the form | The name of the custom field displayed on the screen. |
Field type |
|
Custom field Any | The name of the custom field that we want to paste into formthat will be displayed. |
Message about the successful registration of the issue In the text of the successful registration | of the issue you can use a variable generated issue You can use %ISSUE_LINK% to be inserted into your text (for example, to go directly to the link to the issue) variable in your text about successful issue registration. |
Form code | The generated Generated foem code for the insertinserting. |
* required fields.
3. Setting up language in form
To select which language to use in the form you need to add this tags to the code of the form:
<div style='display:none;'><input type='text' id='feedback-language' name='feedback-language' class='feedback-language' placeholder='Выберите язык (en/ru)' value='en'/></div>
If you need English - then leave value='en'. If you need Russian - change value to 'ru'.
4. Use Cases
1. Issue to our company

2. Hosting issue

...
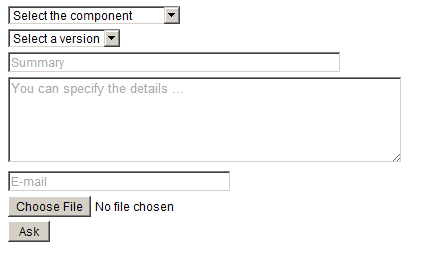
Creating issue from a site page
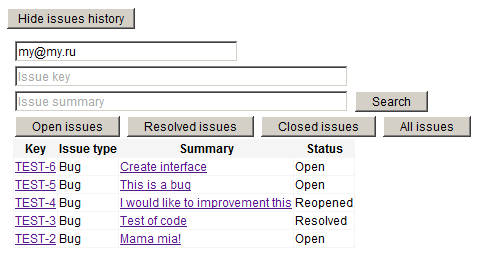
2. Reviewing of your issues from a site page
3. Configurator

4. Code of creating form for insert into a site page:
| Code Block | ||||
|---|---|---|---|---|
| ||||
<STYLE TYPE='text/css'>BODY, input, select, table {
font-size: 12px;font-family: Arial,Helvetica,FreeSans,'sans - serif';}
</STYLE>
<div id='feedback-main-div' style='font-size: 12px; font-family: Arial,Helvetica,FreeSans,sans-serif'>
<div id='feedback-error'></div>
<form enctype='multipart/form-data' id='feedback-form' name='feedback-form' target='feedback-response' method='post' action='http://localhost:8080/plugins/servlet/feedback/create'>
<input type='hidden' name='form-index' id='form-index' value='1'/>
<div><input type='text' id='feedback-summary' name='feedback-summary' size='60' placeholder='Summary' value=''/></div>
<div><TEXTAREA id='feedback-body' name='feedback-body' COLS='62' ROWS='5' placeholder='You can specify the details ...'></TEXTAREA></div>
<div><select id='feedback-component' name='feedback-component'>
<option value='' selected >Select the component</option>
</select>
</div>
<input type='text' id='feedback-email' name='feedback-email' placeholder='E-mail' size='38' value=''/>
<div><input type='file' id='feedback-attachment' name='feedback-attachment' size='38' /></div>
<input type='button' value=' Ask ' onclick='addFeedback()'/>
</form></div>
<iframe id='feedback-response' name='feedback-response' frameborder='no' style='display: none' width='450' height='200'></iframe><div id='feedback-new-issue-div'><input type='button' id='feedback-new-issue-button' value='Create more issue'></div><script type='text/javascript'>
jQuery(window).load(function()
{
   jQuery('#feedback-main-div').show();
   jQuery('#feedback-new-issue-div').hide();
   jQuery('#feedback-response').hide();
   jQuery('#feedback-new-issue-button').click(function ()
   {
    jQuery('#feedback-form')[0].reset();
    jQuery('#feedback-main-div').show();
    jQuery('#feedback-new-issue-div').hide();
    jQuery('#feedback-response').hide();
   });
});

function addFeedback() {
   var summary = jQuery('#feedback-summary').val();
   var email = jQuery('#feedback-email').val();
   if (summary.trim() == '' || email.trim() == '')
   {
    var message = '';
    if (summary.trim() == '')
    {
     message = message + '<div>Enter the summary</div>';
    }
    if (email.trim() == '')
    {
     message = message + '<div>Enter E-mail</div>';
    }
    jQuery('#feedback-error').html(message);
    return false;
}
   jQuery('#feedback-error').html('');
   jQuery('#feedback-main-div').hide();
   jQuery('#feedback-new-issue-div').show();
   jQuery('#feedback-response').show();
   jQuery('#feedback-form').submit();
   return false;
}
</script> |
5. Using Mail Handler
After the plugin is installed new Teamlead Jira Email Handler will appear. It allows you:
- to specify the group which newly created users will be added to;
- to select what group new users will be added to;
- to create issues from emails with empty subject.
To specify the group which newly created users will be added to you need to set up parameter:
userGroup=<usergroup_name>You can see examples of other mail handler parameters on the Atlassian website.
...
| Include Page | |||
|---|---|---|---|
|
|